Widgets
- 22 Mar 2024
- 16 Minutes to read
- DarkLight
Widgets
- Updated on 22 Mar 2024
- 16 Minutes to read
- DarkLight
Article Summary
Share feedback
Thanks for sharing your feedback!
G2 offers a suite of embeddable widgets that can improve your marketing campaigns, help buyers understand your competitive landscape, and supplement your SEO initiatives.
Paste the embed codes for your widgets into any location that supports HTML embeds, such as the source code of your website or a landing page built in HubSpot or Marketo:
To view all of G2's available widgets, go to my.G2, then navigate to Marketing Content > Widgets. For more information on using G2 products to supplement your marketing campaigns, check out G2’s Seller Solutions Webinars.
While the embed code for G2 widgets contains CSS elements that can be modified to fit the size constraints of your website, G2 does not provide support for widgets that fail to render appropriately due to modified CSS.
Grid® widget
G2 Grid® widget helps your customers understand your competitive landscape while highlighting your performance in a specific G2 product category.
There are two types of interactive, embeddable Grid® widgets:
Live Category Grid™
A rendering of your position on the Grid® for each category in which your product is listed, refreshed daily.
Report-based Grid™
A static rendering of your position on the Grid® based on your performance during the reporting period.
For more information on the inclusion criteria, scoring, and the quadrants and axes of a Grid®, review G2’s Research Scoring Methodologies.
You can dedicate a specific logo to represent your product on Grid® widget in my.G2. For more detailed guidelines on adding a custom logo to Grid® widget, refer to G2’s Product Profile documentation.
Live Category Grid™ widgets: Viewing, modifying, and embedding
A Live Category Grid™ is generated for your product according to G2’s standards for inclusion in reports. If your product is included in multiple categories, a unique Grid® will be generated for each category in which your product meets the inclusion criteria.
To view and modify the embed code for your Live Category Grid™:
In my.G2, go to Marketing Content > Widgets > Grid® Widget. All of your available grids are displayed in the Live Category Grid Widgets section.
Select the edit icon in the top-right corner of the Grid® you want to embed or modify.
You will be presented with a customization card containing a preview of your Grid®, as well as several modifiable options:
Size: Modifying this dropdown alters the amount of space the Grid® occupies on your website.
Segment: Modifying this field will display your product’s performance based on the company size of your reviewers. By default, this field is set to All. You might choose to modify this field if your product performs better within a specific market segment (Small Business, Mid-Market, or Enterprise).
Your product must meet the inclusion criteria for a specific Segment (Small Business, Mid-Market, or Enterprise) in order to be included in the Grid® for that Segment. As a result, G2 recommends verifying that your product’s logo appears on the Grid® for your chosen Segment before embedding it on your website.
- Select Copy embed code, and then paste the embed code into your chosen location. This could be the source code of your organization’s website, a landing page built in HubSpot or Marketo, or any other location that supports HTML embeds.
Because this is a live Grid®, your product’s position in the Grid® changes based on new G2 reviews. Additionally, Grid® widgets are interactive -- both your product logo and those of your competitors are selectable and link to the G2 reviews page for the corresponding product.
Report-based Grid™ widgets: Viewing, modifying, and embedding
G2 automatically generates a Report-based Grid™ for your product if it is included in a G2 Market Report. For more information on the inclusion criteria, scoring, and the quadrants and axes of a Grid®, check out G2’s Market Presence Scoring guide.
To view and modify the embed codes for your Report-based Grids™:
- In my.G2, go to Marketing Content > Widgets > Grid® Widget, then scroll to Quarterly Report Grid Widgets.
- View the available Report-based Grids™ by selecting the Report dropdown. Adjust the Size dropdown to change the amount of space the Grid® occupies on your website.
- Select Copy embed code, and then paste the embed code into your chosen location. This could be the source code of your organization’s website, a landing page built in HubSpot or Marketo, or any other location that supports HTML embeds.
Unlike Live Category Grid™ widgets, Report-based Grid™ widgets are tied to a specific report and do not change with new reviews. G2 recommends updating your Report-based Grid™ widgets quarterly to reflect new Market Reports.
Grid® widgets are interactive--both your product logo and the placeholders for the logos of your competitors are selectable and link to the G2 reviews page for the corresponding product.
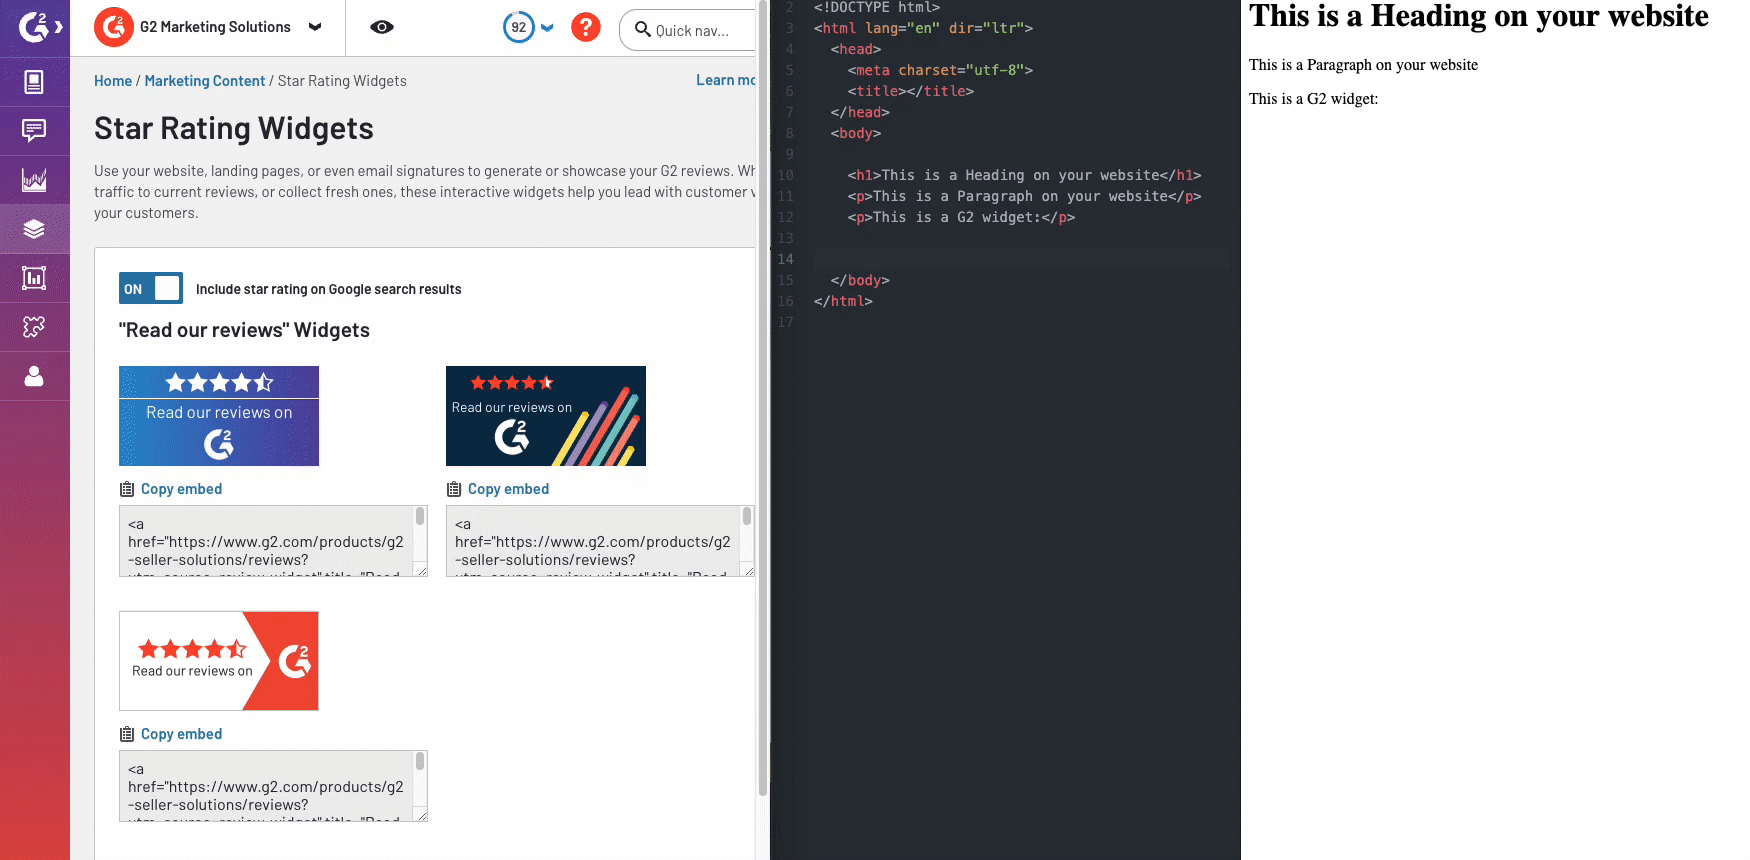
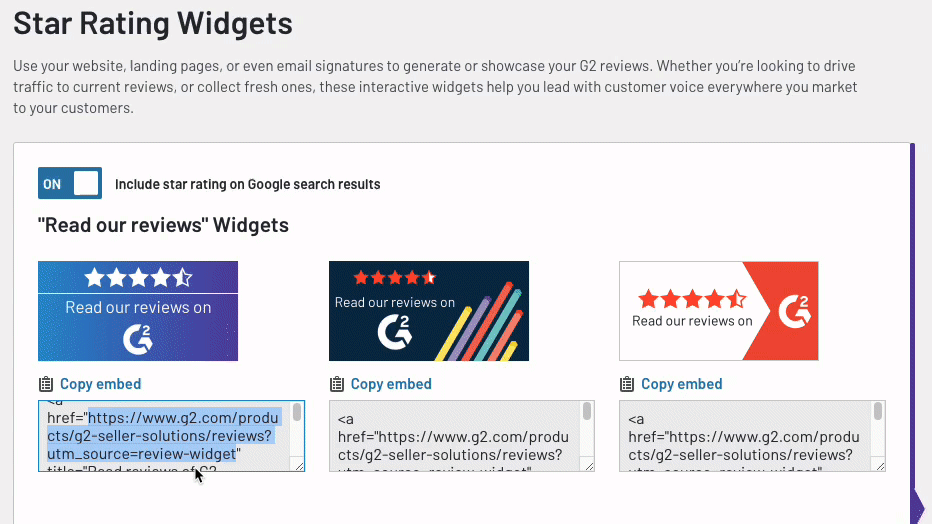
Star Rating widget
Star Rating widget provides a way to use your website, landing pages, sidebars, and email signatures to showcase your G2 reviews. Star Rating widget can also supplement your SEO initiatives and increase your click-through rate (CTR) by displaying the G2 star rating for your products in search engine results.
Read our Reviews
This widget links to your G2 product profile, where users can read your current reviews
Adding Star Rating widget to your website
- In my.G2, go to Marketing Content > Widgets > Star Rating Widget.
- Choose a widget style.
- Select Copy embed code, and then paste the embed code into your chosen location. This could be the source code of your organization’s website, a landing page built in HubSpot or Marketo, or any other location that supports HTML and Javascript embeds.
While Star Rating widget can be added to multiple webpages, G2 does not recommend adding it to every page of your website. Most vendors add Star Rating widget to their most popular pages, such as the homepage or the product information page of their website, which drives the greatest impact in terms of user engagement.
Adding Star Rating widget to email signatures
If your email client or signature software supports HTML code in email signatures, follow the same steps for Adding Star Rating widget to your website, but paste the copied embed code into the relevant section of your email client or software.
Create unique custom signatures for different roles around your company using Star Rating widgets.
For example, your Account Managers can place the “Review us” widget in their email signatures to drive more G2 reviews, while your Sales team can use the “Read our reviews” widget to direct potential customers to the reviews on your G2 product profile.
If you do not have an option to render HTML code in email signatures, you can achieve the same effect by completing the following steps:
- In my.G2, go to Marketing Content > Widgets > Star Rating Widget.
- Right-select the image for the widget you would like to use, then save the image to your local device.
- Extract the URL from the embed code of the widget by copying the URL in quotes following the href attribute (<a href= ”[your URL]“).
- In your email client, upload the saved image from step 2 to your custom signature.
- Apply the URL from step 3 to your image.
If using Gmail, this can be accomplished by first highlighting the image, then selecting the link icon to display a link dialog box. Paste your URL into the specified box, then select OK.
- Save the signature.
- Send a test email and confirm that Star Rating widget appears in your signature.
Enabling star ratings in search engine results
Search engines can display aggregate ratings for your products, including visual stars, review scores, and number of reviews. Adding Star Rating widget to your website can improve the styling and page rank of your landing page in search engines without requiring your developers to add and maintain schema markup.
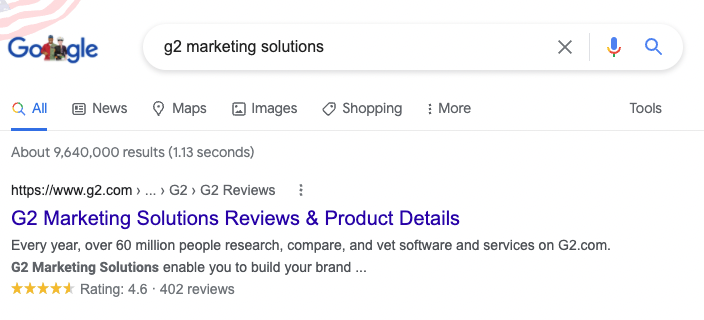
G2 does not recommend enabling this feature if you have existing Product Review schema markup on your website, including if you use G2 Badges to display star ratings in search results.
To enable G2 star ratings in search engines:
- In my.G2, go to Marketing Content > G2 Badges.
- Move the Include star rating on Google search results slider to the ON position.
- Embed your G2 Badge on the relevant product pages of your website.
If your organization has a single product, G2 recommends placing Star Rating widget in the footer of your website to apply Product Review schema to all pages on your website.
If your organization has multiple products, you should place a product-specific Star Rating widget for each product page on your website instead of using the footer. This measure helps maintain the accuracy of G2 star ratings in search results.
From the time this feature is first enabled, search engines can take between two weeks and three months to include G2 star ratings in search results.
While enabling star ratings in search engines makes your webpages eligible for enhanced appearance in internet searches, it does not guarantee that the stars will appear for all keyword searches. Many factors determine whether a search engine shows stars for a search. For more information, review the schema markup guidelines for the search engine you are targeting.
Review Collection widgets
G2's Review Collection widgets, Review Us Button and Review Us Widget, enable you to use your website, landing pages, sidebars, and email signatures to generate and showcase your G2 reviews.
To access Review Collection widgets, go to my.G2, then navigate to Marketing Content > Widgets > Review Collection Widgets.

Review Us Button
Review Us Button enables you to easily capture reviewer interest from your website or landing page by adding a customizable button that triggers your G2 review form in a pop-up overlay.

You can demo this widget by selecting Write a Review below.
Basics of Review Us Button
Reviewer authentication
To improve conversion rates, Review Us Button enables your users to defer login until they have completed their review.

Upon submission of their review, users will be prompted to log in or create their G2 account.

To ensure reviewer authenticity, reviews will not enter G2’s moderation queue until the reviewer creates or logs into their G2 account.
Incentivization and segmentation
Per the G2 Community Guidelines, your organization cannot segment reviewers to solicit only positive reviews.
Only non-incentivized reviews are available for submission via Review Us Button. Gift cards or other incentives can not be attached to this process.
Tracking reviews generated via Review Us Button

To monitor the success of Review Us Button in generating G2 reviews:
- Go to my.G2, then Review Management > Review Activity.
- From the Review Source drop-down, select In-App.
Implementation
Review Us Button can be embedded directly in your website’s source code, or any CMS page that supports HTML and JavaScript.
Review Us Button is a plug-and-play, low-code solution. You do not need to have web development experience to implement this widget.
The following instructions provide a high-level overview of implementing Review Us Button, which should be adapted to your particular CMS or website.
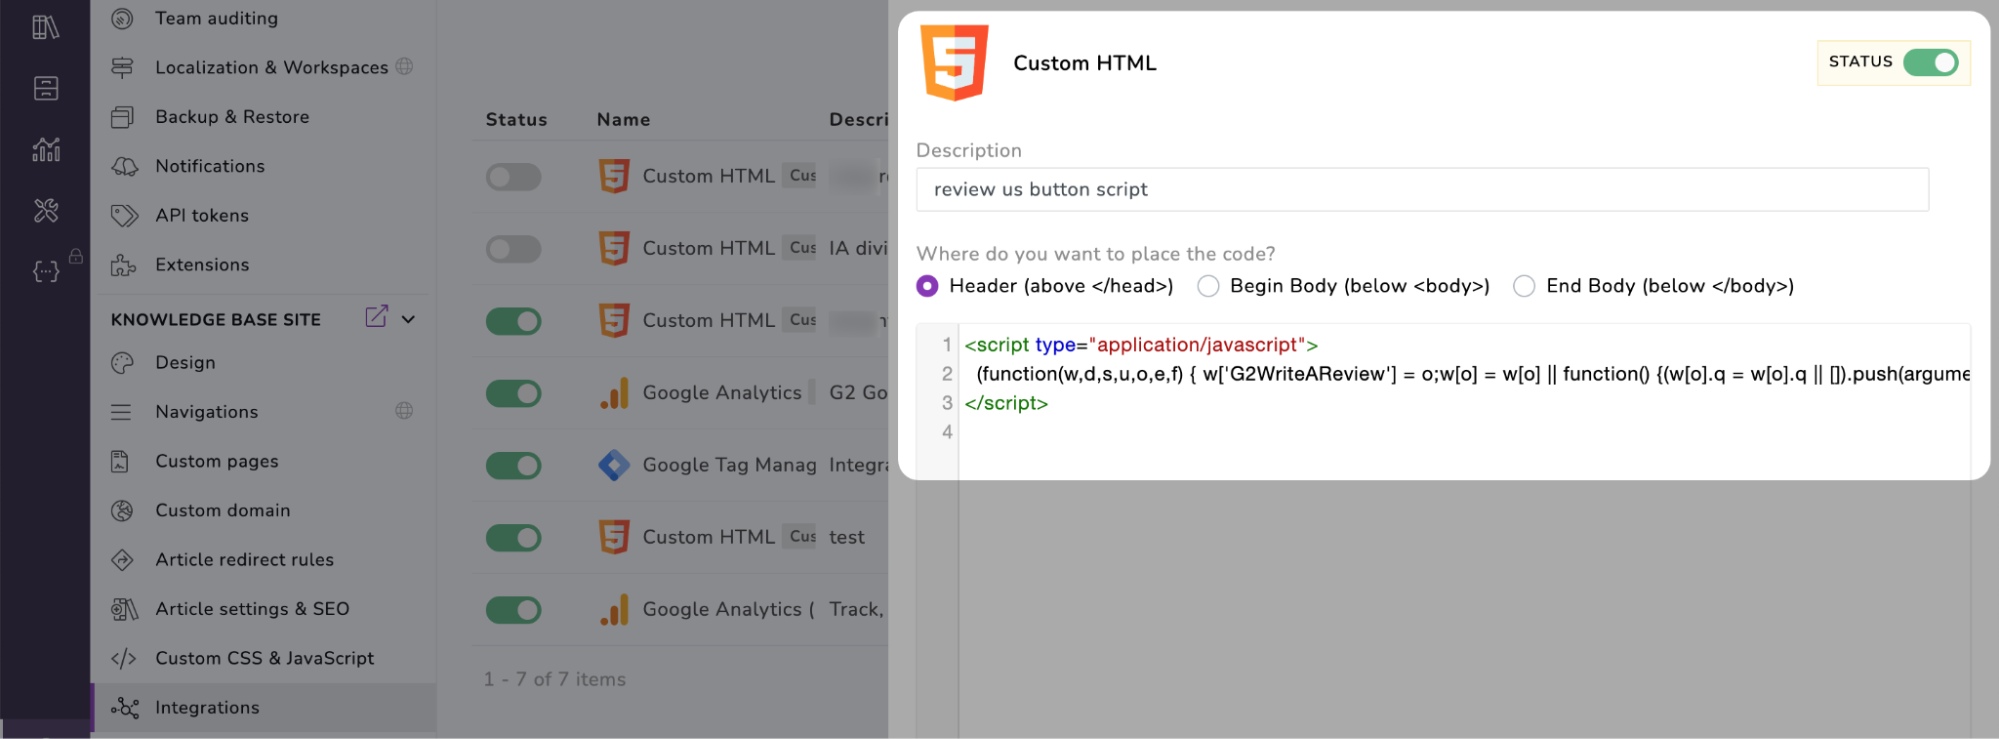
1. Customize button in my.G2
To access Review Us Button, go to my.G2, then navigate to Marketing Content > Widgets > Review Collection Widgets > Review Us Button.
You can customize the styling of your button using the to match your product’s branding.

Button styles are tied to your embed code. If you update your styles, you must re-embed the script code in the Step 2: Add the following to the head of your document section.
2. Access embed codes in my.G2
Your embed codes can be found in the Implementation Steps section. You should keep this tab open for the remainder of the implementation process.

3. Add the CTA code to your website or landing pages
This step uses the code in the Step 1: Add the following where you want the CTA to appear section.
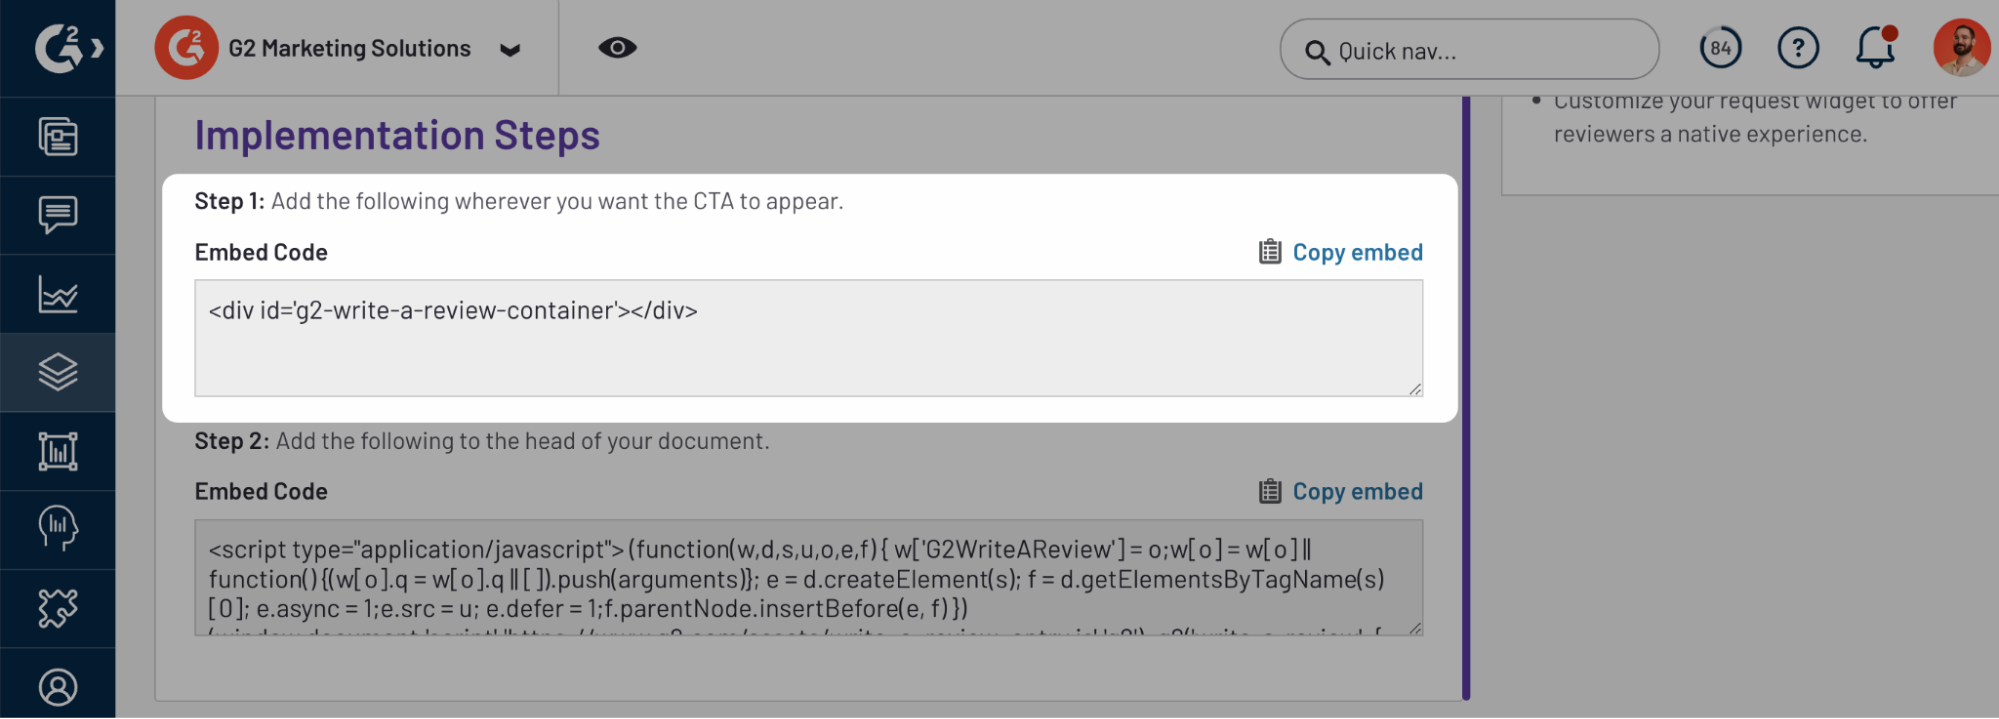
Paste this code directly into the corresponding page(s) of your CMS where you want your review button to appear.

This code is just a placeholder and does not contain any content. Nothing will appear in your CMS preview after adding this code.
You can only add one Review Us Button CTA per page on your website.
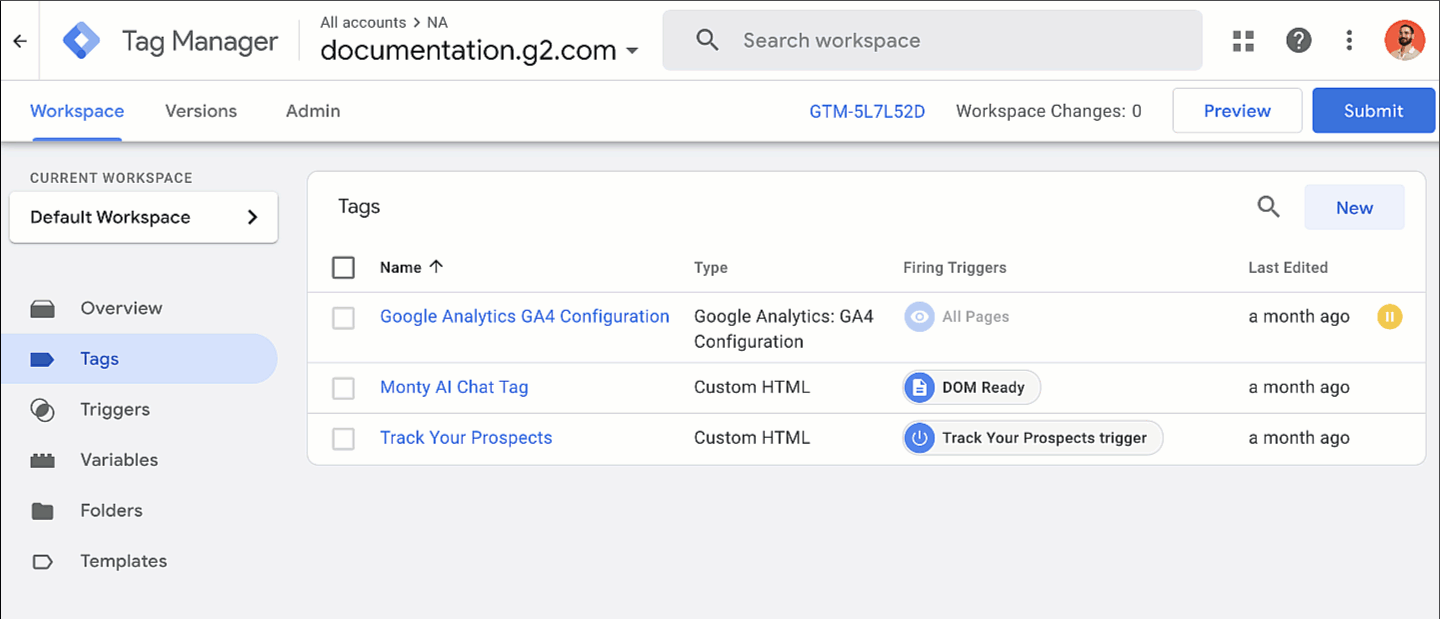
4. Add the remaining script code to your CMS
This step uses the code in the Step 2: Add the following to the head of your document section.

Paste this code directly into the dedicated portion of your CMS that accepts custom code. If possible, you should add it to the head (between the <head> and </head> tags) of the page.
If your CMS does not support adding HTML to the head of your page, you can also try embedding this code in the same place as the CTA code from the previous step.
Alternatively, if you use Google Tag Manager, you can create a Custom HTML tag to insert this script.
5. Publish your changes
Once your embed codes have been added to the corresponding locations, publish your changes, then test out your button!
Review Us widget
Review Us widget enables you to use your website, landing pages, sidebars, and email signatures to generate and showcase your G2 reviews. Similar to Star Rating widget, Review Us widget can also supplement your SEO initiatives and increase your click-through rate (CTR) by displaying the G2 star rating for your products in search engine results.
This widget links directly to a new G2 review form for your product. To leave a review, users must create or sign in to their G2 account.
To access Review Us widget, go to my.G2, then navigate to Marketing Content > Widgets > Review Collection Widgets > Review Us Widget.

For more information on using Review Us Widget, refer to the Star Rating widget section.
Testimonials widget
Testimonials widget provides a simple way to highlight your favorite G2 reviews by crafting a shareable, branded widget that can be customized for your target audience. This widget gives you the flexibility to integrate your hand-picked reviews seamlessly into your website and landing pages.
For each Testimonials widget you create, G2 also provides access to a Testimonials page, which is a web page rendering of your Testimonials widget. G2 hosts your Testimonials page to use whenever you want to direct potential buyers to reviews for your product in an isolated environment. For the sample Testimonials widget above, follow this link to see how the Testimonials page appears.
Creating a new Testimonials widget
You can create an unlimited number of unique widgets that feature reviews for specific audiences or implementations.
To create a new Testimonials widget:
In my.G2, go to Marketing Content > Widgets > Testimonials.
Select Add Widget to access the Create a Testimonial Widget editor.
Title your widget, choose a Font, and select a Branding color. The Branding color modifies the color of the text of the review titles.
Select Choose Reviews to find and select the reviews you want to include in your Testimonials widget. G2 automatically adds two suggested reviews.
Select Add this Review for each review you want to display. You can add up to 20 reviews per widget, which is tracked by a counter at the bottom of the page.
Selecting Clear Filters removes all of your selected reviews.
After all your reviews are added, select Save to access the Update Testimonial Widget editor.
In this editor, you can:
- Review and modify the title, font, and branding color for your Testimonials widget.
- Rearrange the display order of reviews by dragging the drag handle in the left column next to each review.
- Copy the direct URL for your Testimonials page.
- Copy the embed code for your Testimonials widget.
Paste the embed code into your chosen location. This could be the source code of your organization’s website, a landing page built in HubSpot or Marketo, or any other location that supports HTML embeds.
Select Save to record your changes. Your new widget will populate on the Testimonials Widget landing page. To further modify or copy the embed code for your new widget, return to Marketing Content > Widgets > Testimonials, then select the edit icon.
Viewing and updating your Testimonials widgets
You might want to review and update your Testimonials widgets to include newer reviews or to make adjustments to styling.
To view and update your Testimonials widgets:
In my.G2, go to Marketing Content > Widgets > Testimonials.
The Testimonials Widgets section contains a list of all your widgets.
From this page, you can:
- Copy the direct URL for your Testimonials page by selecting the clipboard icon.
- Modify the Testimonials widgets by selecting the edit icon.
- Delete the Testimonials widgets by selecting the trash can icon.
- Sort your widgets by selecting the Title, Date created, or Date last modified column headers .
To modify a Testimonials page, select the edit icon to access the Update Testimonial Widget editor.
In this editor, you can:
- View and modify the title, font, and branding color for your Testimonials widget.
- Rearrange the display order of reviews by dragging the drag handle in the left column next to each review.
- Copy the direct URL for your Testimonials page.
- Copy the embed code for your Testimonials widget.
Paste the embed code into your chosen location. This could be the source code of your organization’s website, a landing page built in HubSpot or Marketo, or any other location that supports HTML embeds.
- Select Save to record your changes. The “Date last modified” field will update to the current date to reflect your recent changes.
Review Snapshot widget
Review Snapshot widget provides a convenient way to display G2 reviews on your website, landing pages, and sidebars. This widget offers a customizable, interactive experience that gives your potential customers quick access to reviews from real users of your product.
Review Snapshot allows you to create unique, industry-specific widgets that can be used in your account-based marketing (ABM) campaigns. For more information on ABM campaigns, review G2 Learn Hub’s A Beginner’s Guide to Building an Account-Based Marketing Strategy.
Creating Review Snapshot widgets
To create a new Review Snapshot widget:
- In your my.G2 page, navigate to Marketing Content > Widgets > Review Snapshot.
- Select Add Widget to access the Create a Review Snapshot Widget editor.
- Title your widget, choose a Color Palette, and input a Background color.
- Select Choose Reviews to find and select the reviews you want to include in your Review Snapshot widget. You can add up to five reviews per widget, which is tracked by a counter at the bottom of the page.
Selecting Clear Filters removes all of your selected reviews.
- Select Save to add your reviews to the editor.
- Your new widget will populate on the Review Snapshot landing page. To copy the embed code, or to further modify your new widget, return to Marketing Content > Widgets > Review Snapshot, then select the edit icon.
Review Snapshot widget uses Javascript to display reviews from your G2 product profile. Ensure that the environment you choose to embed Review Snapshot widget supports Javascript.
Viewing and updating your Review Snapshot widgets
You might want to view or modify your Review Snapshot widgets to include newer reviews or to make adjustments to styling.
To view and update your Review Snapshot widgets:
In my.G2, go to Marketing Content > Review Snapshot.
The Review Snapshot Widgets section contains a list of all your widgets. Select the edit icon for a specific widget to access the Update Review Snapshot widget editor.
In this editor, you can:
- View and modify the title, color palette, and background color for your Review Snapshot widget
- Modify the reviews included in the Review Snapshot widget.
- Copy the embed code for your Review Snapshot widget.
Paste the embed code into your chosen location. This could be the source code of your organization’s website, a landing page built in HubSpot or Marketo, or any other location that supports HTML and Javascript embeds.
- Select Save to save your changes.