Track Your Prospects provides insights into how your G2 product profile influences buyer behavior by tracking visitors who navigate between your G2 product profile and your website. When a visitor interacts with your G2 product profile and then your website (or vice versa), you receive data about the specific page visited, the duration between visits, and the firmographic information of the visitor.

Basics of Track Your Prospects
Data collection
Track Your Prospects uses browser fingerprints to collect a visitor’s IP address and browser characteristics. These details are combined into a single string and hashed to create an anonymized identifier.
The hashed identifier is used to match visitor pageviews on your website and on G2 pages relevant to your product. A visitor does not have to commit a specific action on your G2 product profile or your website for event data to be recorded.
Unlike other, third-party methods of attribution tracking, Track Your Prospects does not track the activities of your customers across your website and does not report personally-identifiable information (such as name and address) back to G2.
G2 Buyer Intent data and Track Your Prospects
Like Buyer Intent signals, Track Your Prospects events indicate that a buyer is interested in taking the next step to research your product.
Where Buyer Intent captures enriched data about visitors researching your product and competitors across G2, Track Your Prospects helps attribute G2’s influence on your website traffic while adding firmographic information about your visitors. Use Track Your Prospects events alongside your Buyer Intent signals to completely understand the influence of your G2 product profile on buyers.
Not all visits to G2.com are classified as Buyer Intent data. For example, writing a review does not provide a signal of a potential buyer and is excluded from Buyer Intent.
For more information on G2 Buyer Intent data, refer to the Buyer Intent documentation.
Implementation
You must add a unique Track Your Prospects tag to your website for each of your organization’s G2-listed products. To switch between the my.G2 pages for each of your products, first expand the dropdown at the top of the page by selecting your product name, then select the product you want to view from the list provided.

Option 1: Initializing the Track Your Prospects tag via your website's source code
The simplest way to implement the Track Your Prospects tag is by pasting the embed code into your website's source code. If you don't have access to modify your website's source code, refer to option 2.
To begin tracking your prospects:
- Go to my.G2, then Buyer Activity > Track Your Prospects.
- Toggle Enable Prospect Tracking to ON.
- From the Option 1: Add JavaScript Directly tile, select Start.
- Select Copy embed code to copy the tag to your clipboard.
- Paste a copy of the tracking tag in the body (between the <body> and </body> tags) of your website for every page you want to track traffic, or add the tag to a global header or footer.
Option 2: Initializing the Track Your Prospects tag via Google Tag Manager
Don’t have access to modify the source code of your website? You can use a tag management software such as Google Tag Manager to generate custom HTML tags that fire for specified event triggers.

To begin tracking your prospects:
- Go to my.G2, then Buyer Activity > Track Your Prospects.
- Toggle Enable Prospect Tracking to ON.
- From the Option 2: Google Tag Manager tile, select Start.
- Select Copy embed code to copy the tag to your clipboard.
- Log in to Google Tag Manager, then select the container associated with your website.
- Navigate to Workspace > Tags, then select New.
- Select the Tag Configuration panel to reveal the Choose tag type sidebar.
- Select Custom HTML, the paste the embed code you copied in step 4 into the text box provided.
- Assign triggers by selecting the Triggering panel. G2 recommends firing the tag on All Pages (Page View) by default.
- Name your tag, then select Save.
You must submit and publish the changes to your Google Tag Manager container to apply Track Your Prospects to your website.
Analytics and data export
Once you have embedded a tracking tag on your desired webpage(s), Track Your Prospects begins recording bidirectional traffic between your G2 profile and your webpage(s).
You can also add Google Analytics data or custom identifiers to your Track Your Prospects data. For more information, refer to the Google Analytics sync and Custom IDs sections.
Choose one of the preset timeframes or set a custom timeframe to view the traffic that occurred during your timeframe of interest.

Use the chart to easily analyze trends in the traffic between G2 and your website.

The table view offers more details about each data point represented in the graph.

To export your Track Your Prospects data, select Download CSV. The data included in your export is based on your selected timeframe.
Google Analytics sync
If you use Google Analytics to track website traffic, you can use the Google Analytics Sync section to automatically associate your Track Your Prospects events with Google Analytics visitor data.

If you want to add different custom identifiers, such as UTM IDs or unique user IDs, to your Track Your Prospects events, refer to the Custom IDs section.
Before getting started
By default, Google Analytics assigns a Client ID — a unique web browser identifier — to each visitor on your website. Adding this information to your Track Your Prospects events enables you to track how a buyer navigates across your website before, during, and after researching your product on G2.
For more information, refer to the Exploring Client IDs in Google Analytics section.
Before continuing with the implementation process, ensure that you have access to your website's Google Analytics container.
1. Get your Google Analytics property ID
You must provide the ID for your Google Analytics property in order to sync Analytics data with Track Your Prospects. This section describes how to access your property ID for both GA4 and Analytics 360 properties.
GA4
- Navigate to your Google Analytics container, then select Admin.
- Select the correct property from the Property dropdown, then select Data Streams.
- From the Data Streams panel, select your data stream.
- Copy the MEASUREMENT ID to your clipboard.

Analytics 360
- Navigate to your Google Analytics container, then select Admin.
- From the Property column, select Property Settings.
- Copy your Tracking Id.

2. Activate Google Analytics data collection
To associate Google Analytics Client IDs with Track Your Prospects events:
- Go to my.G2, then Buyer Activity > Track Your Prospects.
- In the Google Analytics Sync section, paste your Google Analytics property ID.
- Select Save. All new Track Your Prospects events will include Google Analytics Client IDs when available.
Client ID data might not be available for every Track Your Prospects event, such as for users who run ad blockers or use certain browsers that block tracking scripts.
After enabling Google Analytics sync, G2 adds a dedicated Analytics Client ID column to the Track Your Prospects Analytics table.

This column is also included in your CSV export.
Exploring Client IDs in Google Analytics
You can use the IDs in Analytics ID column to explore visitor navigation behavior in both GA4 and Analytics 360.
GA4

To identify visitor activity in GA4:
- Export your Track Your Prospects data to a CSV.
- Log in to Google Analytics, then navigate to the Explore tab.
- Select Template gallery, then select User explorer. The resulting table groups your GA4 events – such as sessions, revenue, transactions, and conversions – by the user's client ID.
- Confirm your date range, then export your Google Analytics data to a CSV.
You can now cross-reference the client IDs in your GA4 export with the client IDs in your Track Your Prospects export using your spreadsheet application of choice.
Analytics 360
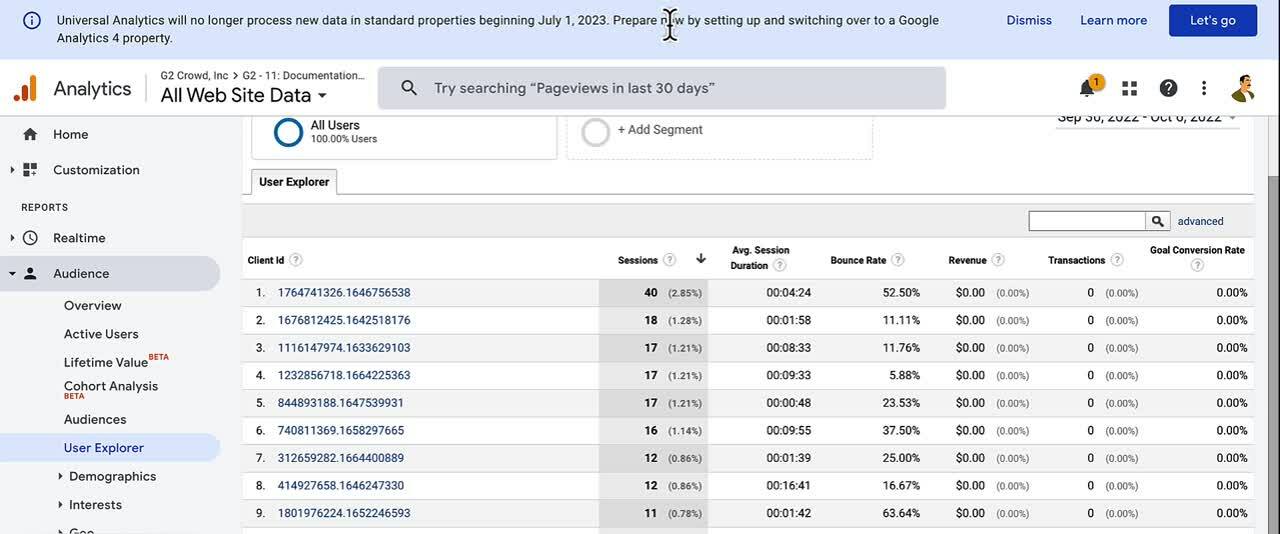
To identify visitor activity in Analytics 360:
- Export your Track Your Prospects data to a CSV.
- Log in to Google Analytics, then navigate to Audience > User Explorer.
- Confirm your date range, then export your Google Analytics data to a CSV.
You can now cross-reference the Client IDs in your Analytics 360 export with the Client IDs in your Track Your Prospects export using your spreadsheet application of choice.
Analytics 360 also enables you to search for individual Client IDs directly from the User Explorer tab.
Custom IDs
The custom ID field of the Track Your Prospects tag enables you to associate prospects with your organization's internal identifiers, such as unique user IDs, analytics IDs, or UTM IDs. Data inserted into the custom ID field appears in the Custom ID column of the Track Your Prospects tab, and in CSV exports of your Track Your Prospects data.

To pass a value to Track Your Prospects, insert your unique identifier into the id parameter of the JavaScript tag.
<script>
(function (c, p, d, u, id, i) {
id = ' YOUR CUSTOM ID '; // Optional Custom ID for user in your system
u = 'https://tracking.g2crowd.com/attribution_tracking/conversions/' + c + '.js?
p=' + encodeURI(p) + '&e=' + id;
i = document.createElement('script');
i.type = 'application/javascript';
i.async = true;
i.src = u;
d.getElementsByTagName('head')[0].appendChild(i);
}("000", document.location.href, document));