Video documentation
Basics of the Chili Piper integration
The G2 + Chili Piper integration leverages your G2 product profile traffic by enabling buyers to schedule meetings with your team directly from your G2 Lead form.

Scheduling flow
When a buyer submits your G2 Lead form, Chili Piper automatically qualifies the lead, routes the lead to the correct salesperson, and displays a self-scheduler to book a time based on the criteria you set in your meeting queues.
For more information on how Chili Piper integrates with your CRM, refer to Chili Piper’s Data flow documentation.
G2 Lead data and Chili Piper
G2 sends the following Lead data to Chili Piper:
- First name
- Last name
- Business email
- Phone number
- Company
- Company size
- Industry
These fields can be used to create or update prospect data in your CRM.
Additional G2 Lead form fields, including hidden fields, are not sent to Chili Piper.
How company size data populates in Chili Piper
To make creating workflows using company size data easier, G2 converts company size ranges into a single integer by using the upper end of the range. For example, if a buyer selects 11-50 employees on the G2 Lead form, G2 sends 50 to your Chili Piper workspace.
The following table shows the possible selections for the Company Size field and the corresponding number sent to Chili Piper.
| G2 Lead form option | Number sent to Chili Piper |
| Myself Only |
|
| 2-10 employees |
|
| 11-50 employees |
|
| 51-200 employees |
|
| 201-500 employees |
|
| 501-1000 employees |
|
| 1001-5000 employees |
|
| 5001-10000 employees |
|
| 10001+ employees |
|
Implementation
Before getting started
To set up this integration, you must have admin access to both my.G2 and your organization’s Chili Piper workspace.
For multiproduct vendors: you must repeat all of the implementation steps for each of your G2-listed products.
Customizing your Lead form CTA with Chili Piper
Prospects access your G2 Lead form by selecting your Lead form CTA button.

If you have a Custom CTA or Free Trial CTA active, your default Lead form CTA button text is “Contact {YOUR COMPANY NAME}”.
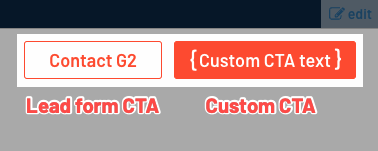
Custom CTA
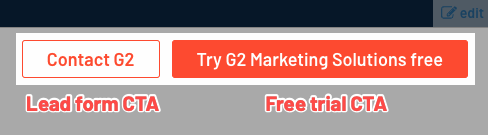
Free Trial CTA
Activating the Chili Piper integration enables you to choose custom text for your Lead form CTA button.

If you do not have a Custom CTA or Free Trial CTA enabled, your Lead Form CTA button text defaults to “Request a Demo” and cannot be customized. Your Chili Piper scheduler will still be displayed after your prospect submits the form.

To clearly direct buyers to your Chili Piper scheduler, G2 recommends ensuring that your Free Trial CTA or Custom CTA does not link to a meeting scheduler.
For more information on modifying your Free Trial CTA / Custom CTA button, refer to the CTA settings section of the Leads documentation.
1. (Optional) Map your G2 Lead form to Salesforce or HubSpot
If you use Chili Piper to create or update prospect information in Salesforce or HubSpot, you must define how Chili Piper should map G2’s Lead form fields to the corresponding data fields in your CRM.
Salesforce users can map G2 form data to the Lead and Contact objects. HubSpot users can map G2 form data to the Contact property.
1a. Map default fields
Salesforce and HubSpot use the first name, last name, and email to create and update prospect data. Mapping these default fields is the minimum mapping required to read and write data to your CRM.
To map the G2 Lead form fields to your CRM:
- Log in to your Chili Piper team workspace.
- From the left sidebar, select Forms, then select ADD NEW FORM.
- Name your form with a descriptive name, such as “G2 Lead form mapping”. Chili Piper automatically populates your form with the First Name, Last Name, Email, and Phone fields.
- Map the default fields by replacing the automatically-generated Form field name with the correct G2 Form field name using the following table.
| Label | G2 Form field name |
| First name | FirstName
|
| Last name | LastName
|
Email
|
|
| Phone | Phone
|

1b. Map company information
You can also map company information collected on the G2 Lead form to Salesforce and HubSpot. While these are not required by your CRM, you might want to use this data for routing and qualifying your leads.
To map to your CRM, select ADD NEW FIELD. Then, set a Label, select a CRM field from the dropdown, and enter the corresponding G2 Form field name.

To prevent your Form field name entry from being overwritten, you must select your CRM field from the dropdown before entering the Form field name.
The Error message field is not required for mapping. G2 recommends leaving it blank.
G2 recommends using the following Salesforce or HubSpot table to map the Industry, Company, and Company Size fields to your CRM.
G2 recommends using the following table for mapping to the Salesforce Lead object.
| Label | Lead (dropdown) | G2 Form field name |
| Company | Company | Company
|
| Company Size | No. of Employees | CompanySize
|
| Industry | Industry | Industry
|
Due to Salesforce’s Account object structure, the Industry, Company, and Company Size fields do not have corresponding fields on the standard Contact object. If you are interested in mapping G2 company data to Salesforce Contacts, please create and map to custom Salesforce fields.
G2 recommends using the following table for mapping to the HubSpot Contact property.
| Label | Contact (dropdown) | G2 Form field name |
| Company | Company | Company
|
| Company Size | CompanySize | CompanySize
|
| Industry | Industry | Industry
|
2. Create the inbound router
Chili Piper’s inbound router is used to set your form mapping, select meeting queues, and style your scheduler. G2 recommends creating a new inbound router for this integration in order to easily keep track of leads originating from G2.
For more information on tracking meetings booked through this integration, refer to the Tracking bookings from G2 section.
To create your inbound router:
- Log in to your Chili Piper team workspace.
- From the left sidebar, select Inbound Router, then select ADD NEW INBOUND CONCIERGE.

- Name your router with a descriptive name, such as “{YOUR PRODUCT NAME} G2 Meetings”, then set the Turn on Router slider to the active position.
- If you mapped your G2 Lead form to Salesforce or HubSpot, select the name of your form from the Form Mapping dropdown.

- From the Concierge Settings section, open the Scheduling Queues dropdown.
- Select the slider for each meeting queue you want to use for scheduling G2 leads.

For more information on creating meeting queues, refer to Chili Piper’s Create a Queue for Concierge documentation.
- (Optional) Use the remaining dropdowns in the Concierge Settings section to style your Chili Piper scheduler and define how Chili Piper maps to your CRM. Only the Scheduling Queues dropdown is required for this integration.
To give your prospects the best experience, G2 recommends not setting Router Redirect URLs.
Chili Piper no longer supports Phone Queues or Video Queues, and they are not recommended for this integration.
- (Recommended) Test your router by opening the Embed for your form. Javascript for your Inbound Concierge dropdown, then selecting Copy Link. Paste this link into a new browser window to demo your scheduling flow.

Please retain this router test URL. You will use it to copy your Chili Piper domain and router name in the following section.
- Select Create to finish the router creation process.
3. Copy your Chili Piper domain and router name
To activate the integration in G2, you must have access to your Chili Piper domain and router name. The simplest way to access this information is via the router test URL you used in step 8 of the Create the inbound router section.
For example, in the following router test URL:
https://g2chilipiper.chilipiper.com/router/g2-meetings
The Chili Piper domain is g2chilipiper, and the router name is g2-meetings.
4. Activate the integration in G2
After identifying the Chili Piper domain and router name, you are ready to activate the integration on your G2 profile.
To activate the integration:
- Go to my.G2, then Integrations > Integration Hub.
- Select the Chili Piper tile.
- In the Connect Your Chili Piper Account section, enter your Chili Piper
domainandrouter nameinto the corresponding fields.

To find your domain and router name , refer to the Copy your Chili Piper domain and router name section.
- Enter text for your Lead CTA button. G2 recommends “Schedule a Meeting” or “Schedule a Demo”.
This entry overwrites the default “Contact {YOUR PRODUCT NAME}” text for the Lead CTA button. For more information, refer to the Customizing your Lead form CTA with Chili Piper section.
- Select Save to complete the authentication process.
After selecting save, G2 authenticates your Chili Piper credentials based on the domain and router you entered. If authentication fails, verify that your domain and router name are correct.
Routing and qualifying leads with G2 data
Chili Piper routing rules enable you to direct prospects to the correct representative and disqualify leads based on the criteria you set. You can use G2 Lead data to create routing rules for your Chili Piper meeting queues.
If a buyer does not meet the lead qualification criteria set in Chili Piper, the Chili Piper scheduler will not be displayed.
Buyers who submit a G2 Lead form are high-quality leads. To give your buyers the best experience, G2 recommends avoiding strict lead qualification criteria.
For more information, refer to Chili Piper’s Routing Rules for Concierge documentation.
To add routing rules to a meeting queue:
- Log in to your Chili Piper team workspace.
- From the left sidebar, select Meeting Queues, then select the name of your meeting queue.
- Select ADD RULE to access the Routing Rules editor. If you already set up routing rules for your meeting queue, select EDIT to access the Routing Rules editor.

- From the Object dropdown, select the related object that has the corresponding G2 data mapped to it.
For Salesforce users, select Related Lead or Related Contact. For HubSpot users, select Related Contact.
For more information on mapping G2 data to your CRM, refer to the Map your G2 Lead form to Salesforce or HubSpot section.
- Choose a Field, then apply your routing logic by setting an Operator and Value.

For example, to disqualify prospect organizations that have 10 or fewer employees, use the following routing rule.
| Object | Field | Operator | Value |
| Related Lead | Employees | > | 10 |
Refer to the How company size data populates in Chili Piper section for more information on how G2’s company size ranges are reported.
- Select Save to confirm your new routing rule.
Tracking bookings from G2
You can track meetings made via the G2 + Chili Piper integration in both my.G2 and Chili Piper.
To track meetings in my.G2:
- Log in to my.G2, then navigate to Buyer Activity > Leads > Leads Activity.
- From the Lead filters section, set the Request type dropdown to Booked a meeting through Chili Piper.

- Select See details for any lead to access the Chili Piper meeting details, such as the date and time of the original meeting.

To track meetings in Chili Piper:
- Log in to your Chili Piper team workspace.
- From the left sidebar, select Reports.
- Set the All Concierges dropdown to the name of the inbound router you created during implementation.
