- 15 Jun 2022
- 6 Minutes to read
-
DarkLight
Salesforce notification: Email account owners when their accounts are researching alternatives to your product
- Updated on 15 Jun 2022
- 6 Minutes to read
-
DarkLight
A customer viewing a G2 alternatives page that features your product could indicate that they are at risk for churn. Notifying your Salesforce account owners of this activity as it happens provides an opportunity to contact your customer, offer educational materials, and make them aware that help is available.
This example notification sends an email to Salesforce account owners when one of their accounts views a G2 alternatives page featuring your product.
Alternative signals are generated when a buyer views an alternative page for any product in your G2 category. This flow only sends a notification when a buyer views an alternative page that features your product in the title. For example, an alternatives page featuring G2 Marketing Solutions could be titled "G2 Marketing Solutions Alternatives for Small Businesses in 2022".
For more information on which Buyer Intent signals are included in your subscription, refer to G2 Plans.
1. Create the record-triggered flow
To create a new flow:
- At the top-right corner of any Salesforce page, select Setup.
- In the left sidebar, go to Build > Create > Workflow and Approvals > Flows.
If using Salesforce Lightning, go to Process Automation > Flows.
- Select New Flow to open the Flow Builder.
- Select Record-Triggered Flow, then Create.
- Find the G2 Event object by searching for
G2Crowd__G2_Event__cin the Object search box. Set Configure Trigger to A record is created. - Set Entry conditions.
For this example, the entry conditions are used to filter for new G2 alternative pageviews that indicate a buyer organization is specifically looking for alternatives to your product. Set the Conditions Requirements dropdown to All Conditions Are Met (AND) and add the following conditions:
| Row | Field | Operator | Value | Description |
|---|---|---|---|---|
| 1 | G2Crowd__Tag__c |
Contains | competitors |
Finds the G2 Event tag for alternatives pageviews ( products.competitors ) |
| 2 | G2Crowd__Account__c |
Is Null | False |
Does not send a notification if G2 could not determine the organization responsible for the signal. Salesforce refers to this value as $GlobalConstant.False |
| 3 | G2Crowd__Title__c |
Contains | {{your product name}} |
Checks if the G2 alternatives page featured your product. For example, entering G2 Marketing Solutions as the value would match the page title "G2 Marketing Solutions Alternatives for Small Businesses in 2022" |
- Set Optimize the Flow to Actions and Related Records, then select Done.
- In the top-right corner of Flow Builder, select Save, then enter a name for your Flow (Flow Label). The Flow API Name auto-populates based on your Label entry.
- Select Save to finalize your Flow creation.
2. Create the notification Resources
Resources enable you to create custom variables, formulas, and text templates to customize your notification with specific event data, such as a record URL, an account name, and the account owner’s email address. This notification uses variables to fill in G2 Event data, formulas to fill in direct URLs to the account and event records, and text Templates to use the Variables and Formulas in the notification message body.
To create the variables for your notification:
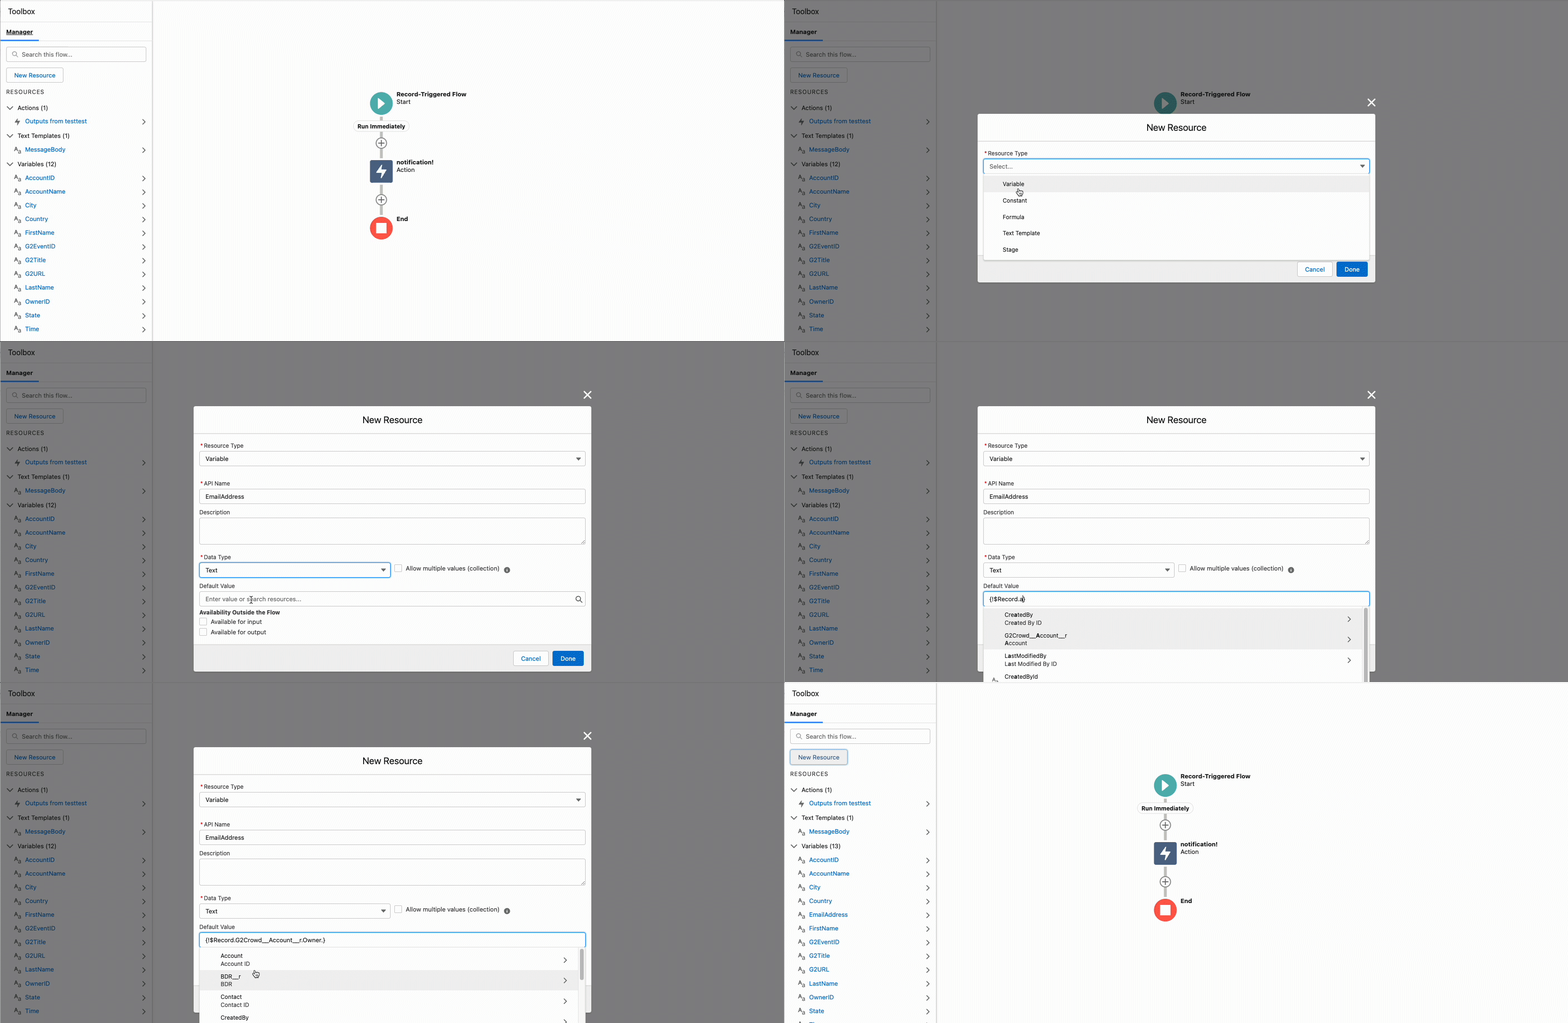
- In the left sidebar of the Flow Builder, select New Resource, then select Variable from the Resource Type dropdown.
- Enter an API Name (this is the name for your variable), set the Data Type to Text and check Available for input. A Default Value box will appear.
To enter a Default Value, you must understand how to access G2 custom objects in Salesforce.

For example, to access the email address of an account owner, select Record > G2Crowd__Account__ > Owner > Email. You must select the dropdown option at each step to build your Default Value. Your final Default Value is $Record.G2Crowd__Account__r.Owner.Email.
The following table illustrates the API Name, the Default Value, and the search queries you should enter into the text box to quickly access the correct value.
| API Name | Default Value | Search query |
|---|---|---|
| EmailAddress | $Record.G2Crowd__Account__r.Owner.Email |
Record > Account__r > Owner > Email |
- Repeat steps 1 and 2 for each of the following variables, making sure to set the Data Type to Text and check Available for input for each new variable:
| API Name | Default Value | Search query |
|---|---|---|
| EmailAddress | $Record.G2Crowd__Account__r.Owner.Email |
Record > Account__r > Owner > Email |
| AccountID | $Record.G2Crowd__Account__c |
Record > Account__c |
| AccountName | $Record.G2Crowd__Account__r.Name |
Record > Account__r > Name |
| G2Title | $Record.G2Crowd__Title__c |
Record > Title |
| FirstName | $Record.G2Crowd__Account__r.Owner.FirstName |
Record > Account__r > Owner > First Name |
| LastName | $Record.G2Crowd__Account__r.Owner.LastName |
Record > Account__r > Owner > Last Name |
| Time | $Record.G2Crowd__Time__c |
Record > Time |
| G2URL | $Record.G2Crowd__URL__c |
Record > URL |
| G2EventID | $Record.Id |
Record > Id |
| City | $Record.G2Crowd__City__c |
Record > City |
| State | $Record.G2Crowd__State__c |
Record > State |
| Country | $Record.G2Crowd__Country__c |
Record > Country |
To create formulas to populate your notification with Salesforce URLs that link directly to the G2 Event and account:
- In the left sidebar of the Flow Builder, select New Resource, then select Formula from the Resource Type dropdown.
- Set the Data Type to Text, enter the following information to build an account URL, then select Done:
| API Name | Formula |
|---|---|
| AccountURL | LEFT({!$Api.Partner_Server_URL_260}, FIND( '/services', {!$Api.Partner_Server_URL_260})) + "/lightning/r/AccountID/" + {!AccountID} + "/view" |
- Repeat step 2 with the following information to build a G2 Event record URL:
| API Name | Data Type | Formula |
|---|---|---|
| G2EventURL | Text | LEFT({!$Api.Partner_Server_URL_260}, FIND( '/services', {!$Api.Partner_Server_URL_260})) + "/lightning/r/EventID/" + {!G2EventID} + "/view" |
To create the text template for your notification message body:
- In the left sidebar of the Flow Builder, select New Resource, then select Text Template from the Resource Type dropdown.
- Enter the name for your message template under API Name. G2 recommends the name MessageBody.
- Set the View dropdown to View as Plain Text.
- Enter your notification message into the Body text box. Your message should use the custom variables you created to fill in relevant data. To insert a variable, select Insert a resource. For this example, you can paste the following message into the Body:
{!FirstName}{!LastName},
{!AccountName} is looking for alternatives to your product on G2.com.
G2 Page Title: {!G2Title}
G2 URL: {!G2URL}
Time of the G2 Activity: {!Time}
G2 Event Link: {!G2EventURL}
Account Link: {!AccountURL}
User Location: {!City}, {!State}, {!Country}
-Your Salesforce Admin
- Select Done.
To create the text template for your notification subject line:
- In the left sidebar of the Flow Builder, select New Resource, then select Text Template from the Resource Type dropdown.
- Enter the name for your subject line template under API Name. G2 recommends the name MessageSubject.
- Set the View dropdown to View as Plain Text.
- Enter your notification message into the Body text box. Select Insert a resource to add one of the variables you created. For this example, you can paste the following message into the Body:
{!AccountName} is looking for alternatives
- Select Done.
3. Add the email notification Action

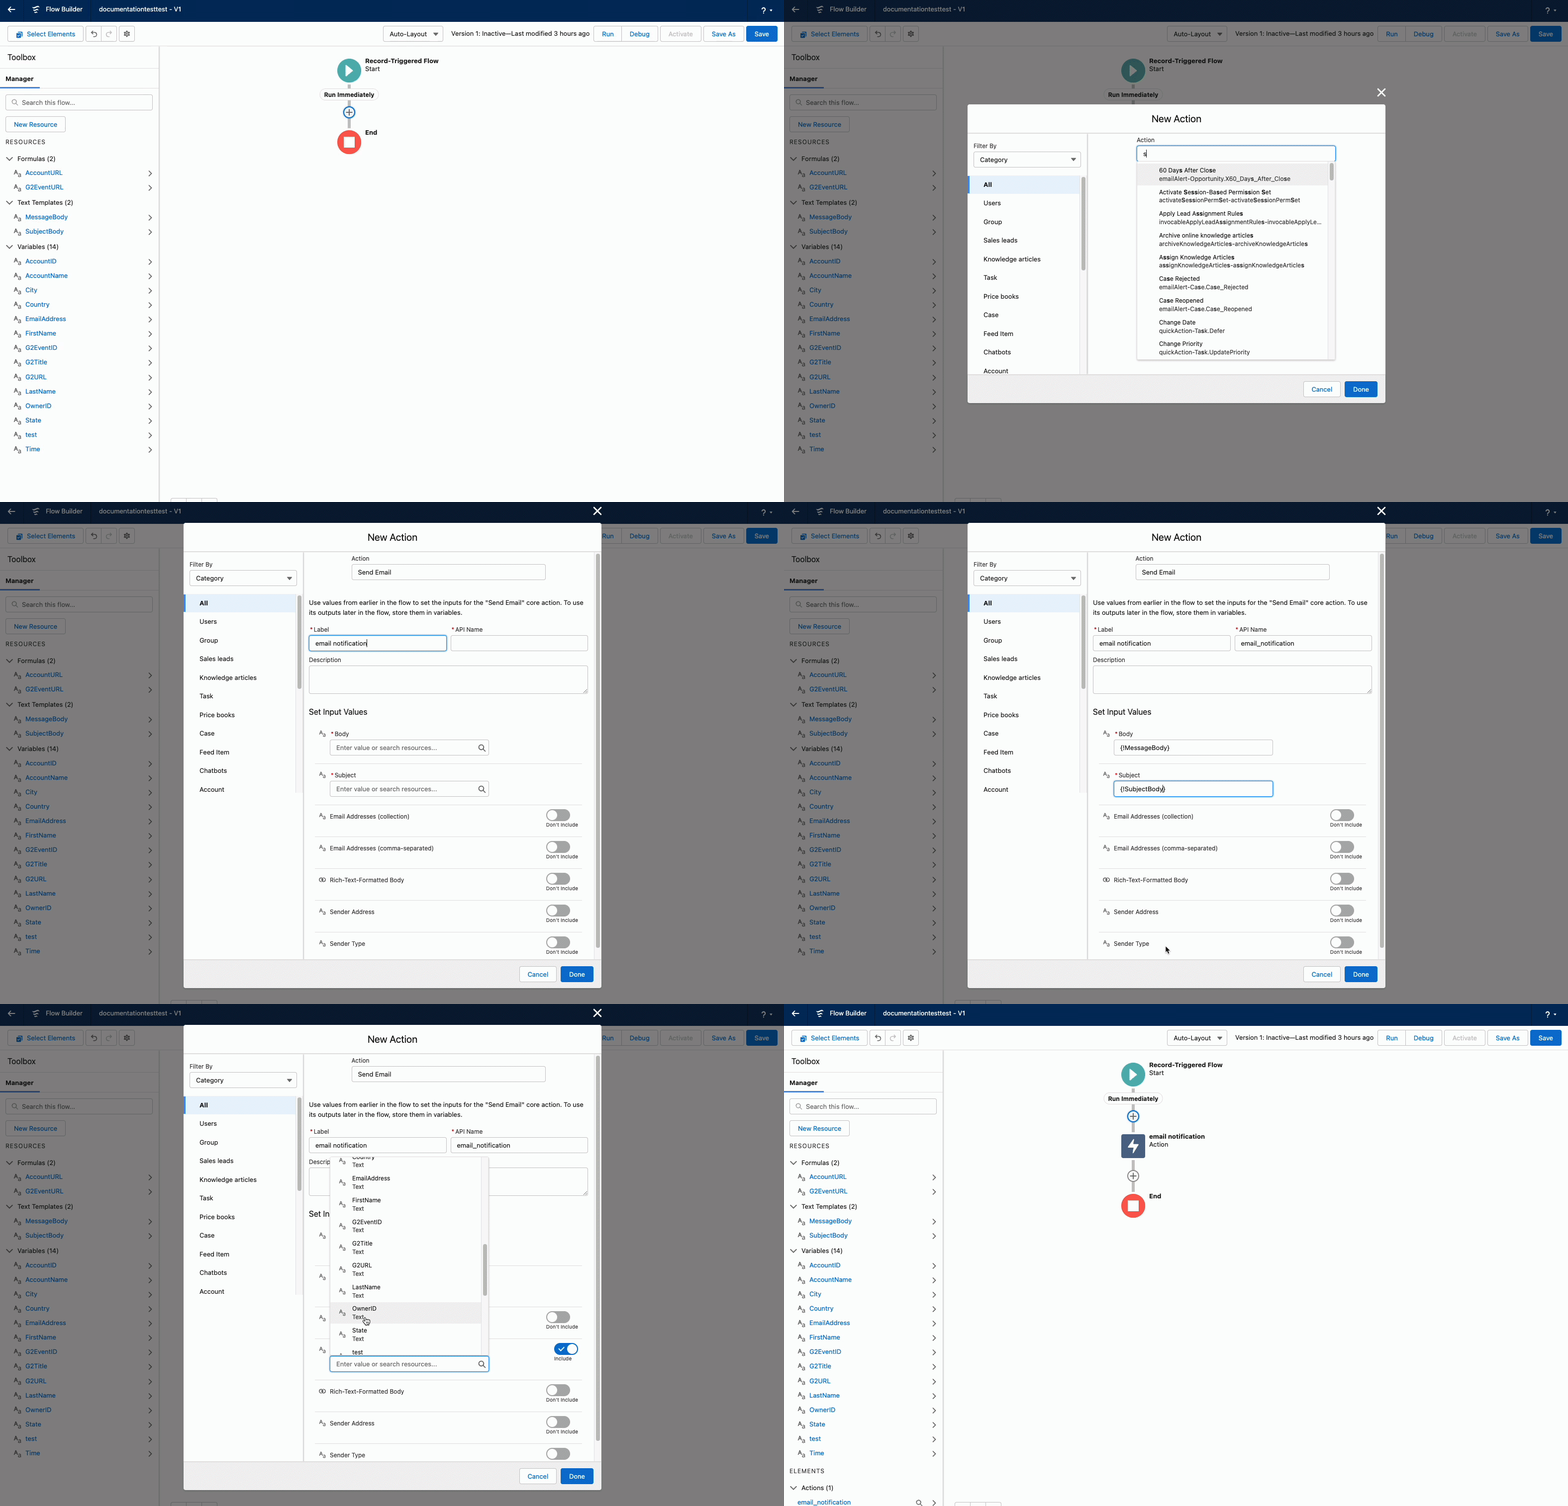
- Select the + below the the Record-Triggered Flow Start, then select Action.
- Search for and select Send Email to open the New Action editor.
- Enter a Label for your action, such as Email Notification. The API Name auto-populates based on your label entry.
- Select your MessageBody Text Template from the Body search box.
- Select your MessageSubject Text Template from the Subject search box.
- Set the Email Addresses (comma-separated) slider to Include. Select the EmailAddress variable you created earlier in this process.
- Select Done to commit your changes to the action. Select Save to apply your changes to the flow.
4. (Recommended) Test and activate your flow
G2 strongly recommends testing your flow before activation. To test your flow:
- Select Debug from the Flow Builder top-right menu.
- Leave all parameters set to their default settings.
- Enter a G2 Event ID into the G2 Event search bar to debug your event using a specific test case. You might have to go to the G2 Events tab in a separate window to find Event IDs.
G2 recommends choosing an event that meets your entry conditions and one that does not meet your entry conditions to assess that your Flow behaves as intended. For this example, test a G2 Event record with an alternatives signal that includes features your product, then test one that does not feature your product.
- Select Run to begin your debug.
- Open the Start Condition Requirements and Action (denoted by a lightning bolt icon) tabs to view how your Text Templates were filled with your custom Variables and Formulas.
- When satisfied, select Activate to turn on your flow.